
从SSM过度——使用SpringBoot创建以Spring框架为基础的后端项目!
🍃 SpringBoot
Springboot是一个极其方便的脚手架(CLI),从Springboot创建工程将变得非常容易,经过SSM的学习过渡到Springboot将会非常轻松,过度到Springboot需要掌握的知识主要是Springboot的配置方式 (yml/properties+注解),其中大部分内容都与SSM中相同。
○IDEA build Springboot project
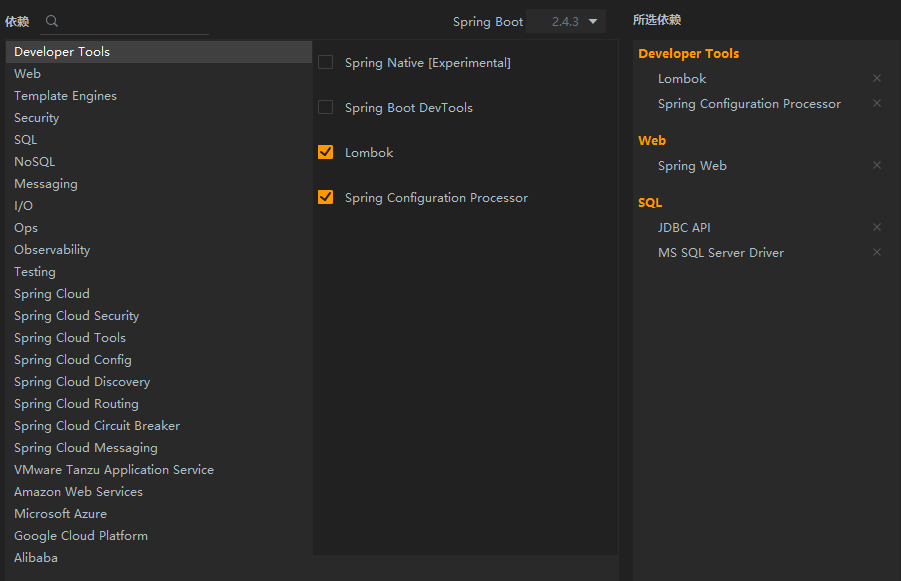
使用idea新建项目中的Spring Initializer,按步骤即可创建 Springboot项目并导入其他框架的依赖。
必备依赖:
- Spring Web
- JDBC API
- MySQL/SQLServer/Oracal等
Springboot的pom.xml默认继承Springboot父类,内部对spring-boot-*类型的jar包进行了版本管理dependenciesManager,因此我们只需要管理非springboot集成的jar包、
○Springboot Config
Springboot的配置分为Application.class以及application.yml/.properties,yml具有更好的可读性和结构性。
○Application
使用注解@SpringBootApplication标注为入口类
每个Springboot应用的入口类,类似于Spring的注解类,其注解已经配置好了一部分内容。我们需要在其中添加main方法:
public static main(String[] args) {
    SpringApplication.run(Application.class, args);
}
Springboot基本上使用注解进行配置,部分注解详见SSM篇
○新注解
<!--注解处理器-->
<dependency>
    <groupId>org.springframework.boot</groupId>
    <artifactId>spring-boot-configuration-processor</artifactId>
    <optional>true</optional>
</dependency>-
@ConfigurationProperties(prefix)prefix:寻找前缀为“prefix"的属性,如jdbc该注解用于将
application.properties/.yml中的配置项(某一项)读取到所注解的类中。类需要有"同名"[1]的属性,即可自动注入。⭐️该注解也可以应用在方法上,比如使用
@Bean注释的方法上,文件中对应属性会注入到方法返回的对象(JavaBean)中 -
@ConfigurationPropertiesScan一般标注在Application类上,标注后会能够自动扫描
@ConfigurationProperties注解的类,注入到IOC中 -
@EnableConfigurationProperties(class)标注在类上,标注后可以从指定的
class中生成"属性类"[2],注入到当前类中,作用类似@...Scan,只不过需要手动指定。 -
@ServletComponentScan开启对
@WebServlet、@WebFilter、@WebListener的支持。
○application.yml
Springboot的核心配置文件,有且仅能使用该名称。该文件用于配置各种框架的参数,如jdbc、spring-mvc等一系列能够与Springboot集成的框架。能够被Springboot自动加载,不需要手动引入。
○模块化
以application-name.yml为格式的文件能够作为副配置文件,需要在主文件中“激活”
# application.yml
spring:
  profiles:
active: "name1,name2"○Spring AOP
<dependency>
    <groupId>org.springframework.boot</groupId>
    <artifactId>spring-boot-starter-aop</artifactId>
</dependency>不需要手动注解@EnableAspectJAutoProxy,即可使用AOP编程。
○Springboot+SpringMvc
通过application.yml可以直接配置Spring Mvc
○新注解
-
@RestController使用此注解标注的类中的方法不需要使用
@ResponseBody,默认返回纯数据。 -
@MatrixVariable获取请求中矩阵变量[3]的值,Springboot默认禁用了这个功能。Springboot对于请求路径的处理是使用了
UrlPathHelper组件进行解析,其中对于;默认采用了**“截断”**的策略,因此无法获取分号后的内容,需要设置该组件中的removeSemicolonContent=false
○静态资源访问
**访问端口:**默认8080,通过application.yml指定server.port修改
Springboot默认会加载classpath:(/static)(/public)(/resource)(/META-INF/resources)下的文件作为静态资源。
○配置拦截器、消息转换器等
配置拦截器(包括视图解析器、消息转换器都一样)需要自定义一个配置类[4]并继承WebMvcConfigurer类,在SSM篇中有详细说明。
⚠️Springboot默认为SpringMvc配置了许多内容,如果不希望覆盖默认的配置就不能使用
@EnableWebMvc注解
○数据类型转换器Converter
自定义的数据类型转换器实现接口Converter<S,D>,并注解@Component即可完成自动装配。
○字符集处理
在SSM中我们需要配置过滤器CharacterEncodingFilter,但是在Springboot中我们不需要Web.xml文件,使用application.yml配置即可。
server:
  servlet:
    encoding:
charset: UTF-8○Springboot+Mybatis
可以在IDEA项目创建阶段勾选SQL->Mybatis Framwork自动引入以下jar包
<dependency>
    <groupId>org.mybatis.spring.boot</groupId>
    <artifactId>mybatis-spring-boot-starter</artifactId>
    <version>2.1.4</version>
</dependency>○连接池策略
可以在IDEA项目创建阶段勾选SQL->JDBC API自动引入以下jar包
<dependency>
     <groupId>org.springframework.boot</groupId>
     <artifactId>spring-boot-starter-jdbc</artifactId>
</dependency>springboot默认使用HikariCP连接池,可以通过spring.datasource直接在配置文件中配置Jdbc参数。通过spring.datasource.type指定自己想要的连接池全限定类名即可更换,前提是需要手动导入相关依赖。
○事务控制
Springboot不需要我们配置TransactionManager,只需要引入spring-boot-starter-jdbc即可使用注解@Transactional
⚠️除非需要修改优先级(Order),否则不需要使用
@EnableTransactionManagement
○Mybatis配置
-
配置文件
mybatis的配置文件也同样直接在
application.yml中编写,以mybatis前缀开头。 -
@MapperScan使用方法与SSM篇中相同
○Springboot Test
<dependency>
    <groupId>org.springframework.boot</groupId>
    <artifactId>spring-boot-starter-test</artifactId>
    <scope>test</scope>
</dependency>测试类直接使用@SpringbootTest(class)注解并指定SpringbootApplication类,Springboot默认使用JUnit5!
⚠️在单元测试中使用
@Transactional注解就算执行成功也会自动回滚,如果需要提交事务请加上@Commit注解
○Thymeleaf
Springboot对Thymeleaf模板引擎有很好的支持,但是也需要一些配置。
○配置ViewController
所有的thymeleaf文件都存放在resource/template中,无法当作静态资源进行访问的,需要通过SpringMvc的视图解析器进行访问,也就是说需要通过@Controller来访问View视图。
-
方法一
在Controller类中配置映射方法,并返回地址字符串,如
return "index"表示访问resource/template/index.html -
方法二
在SpringMvc配置类[4:1]中实现如下方法直接进行视图解析。
@Override
public void addViewControllers(ViewControllerRegistry registry) {
    // 同一个View可以映射到多个地址上
    registry.addViewController("/").setViewName("index");
    registry.addViewController("/index").setViewName("index");
    registry.addViewController("/index.html").setViewName("index");
}